Raspberry Pi 4 Pins Complete Practical Guide The Robotics BackEnd
Raspberry Pi GPIO Schnittstelle Teil 1 DeveloperBlog
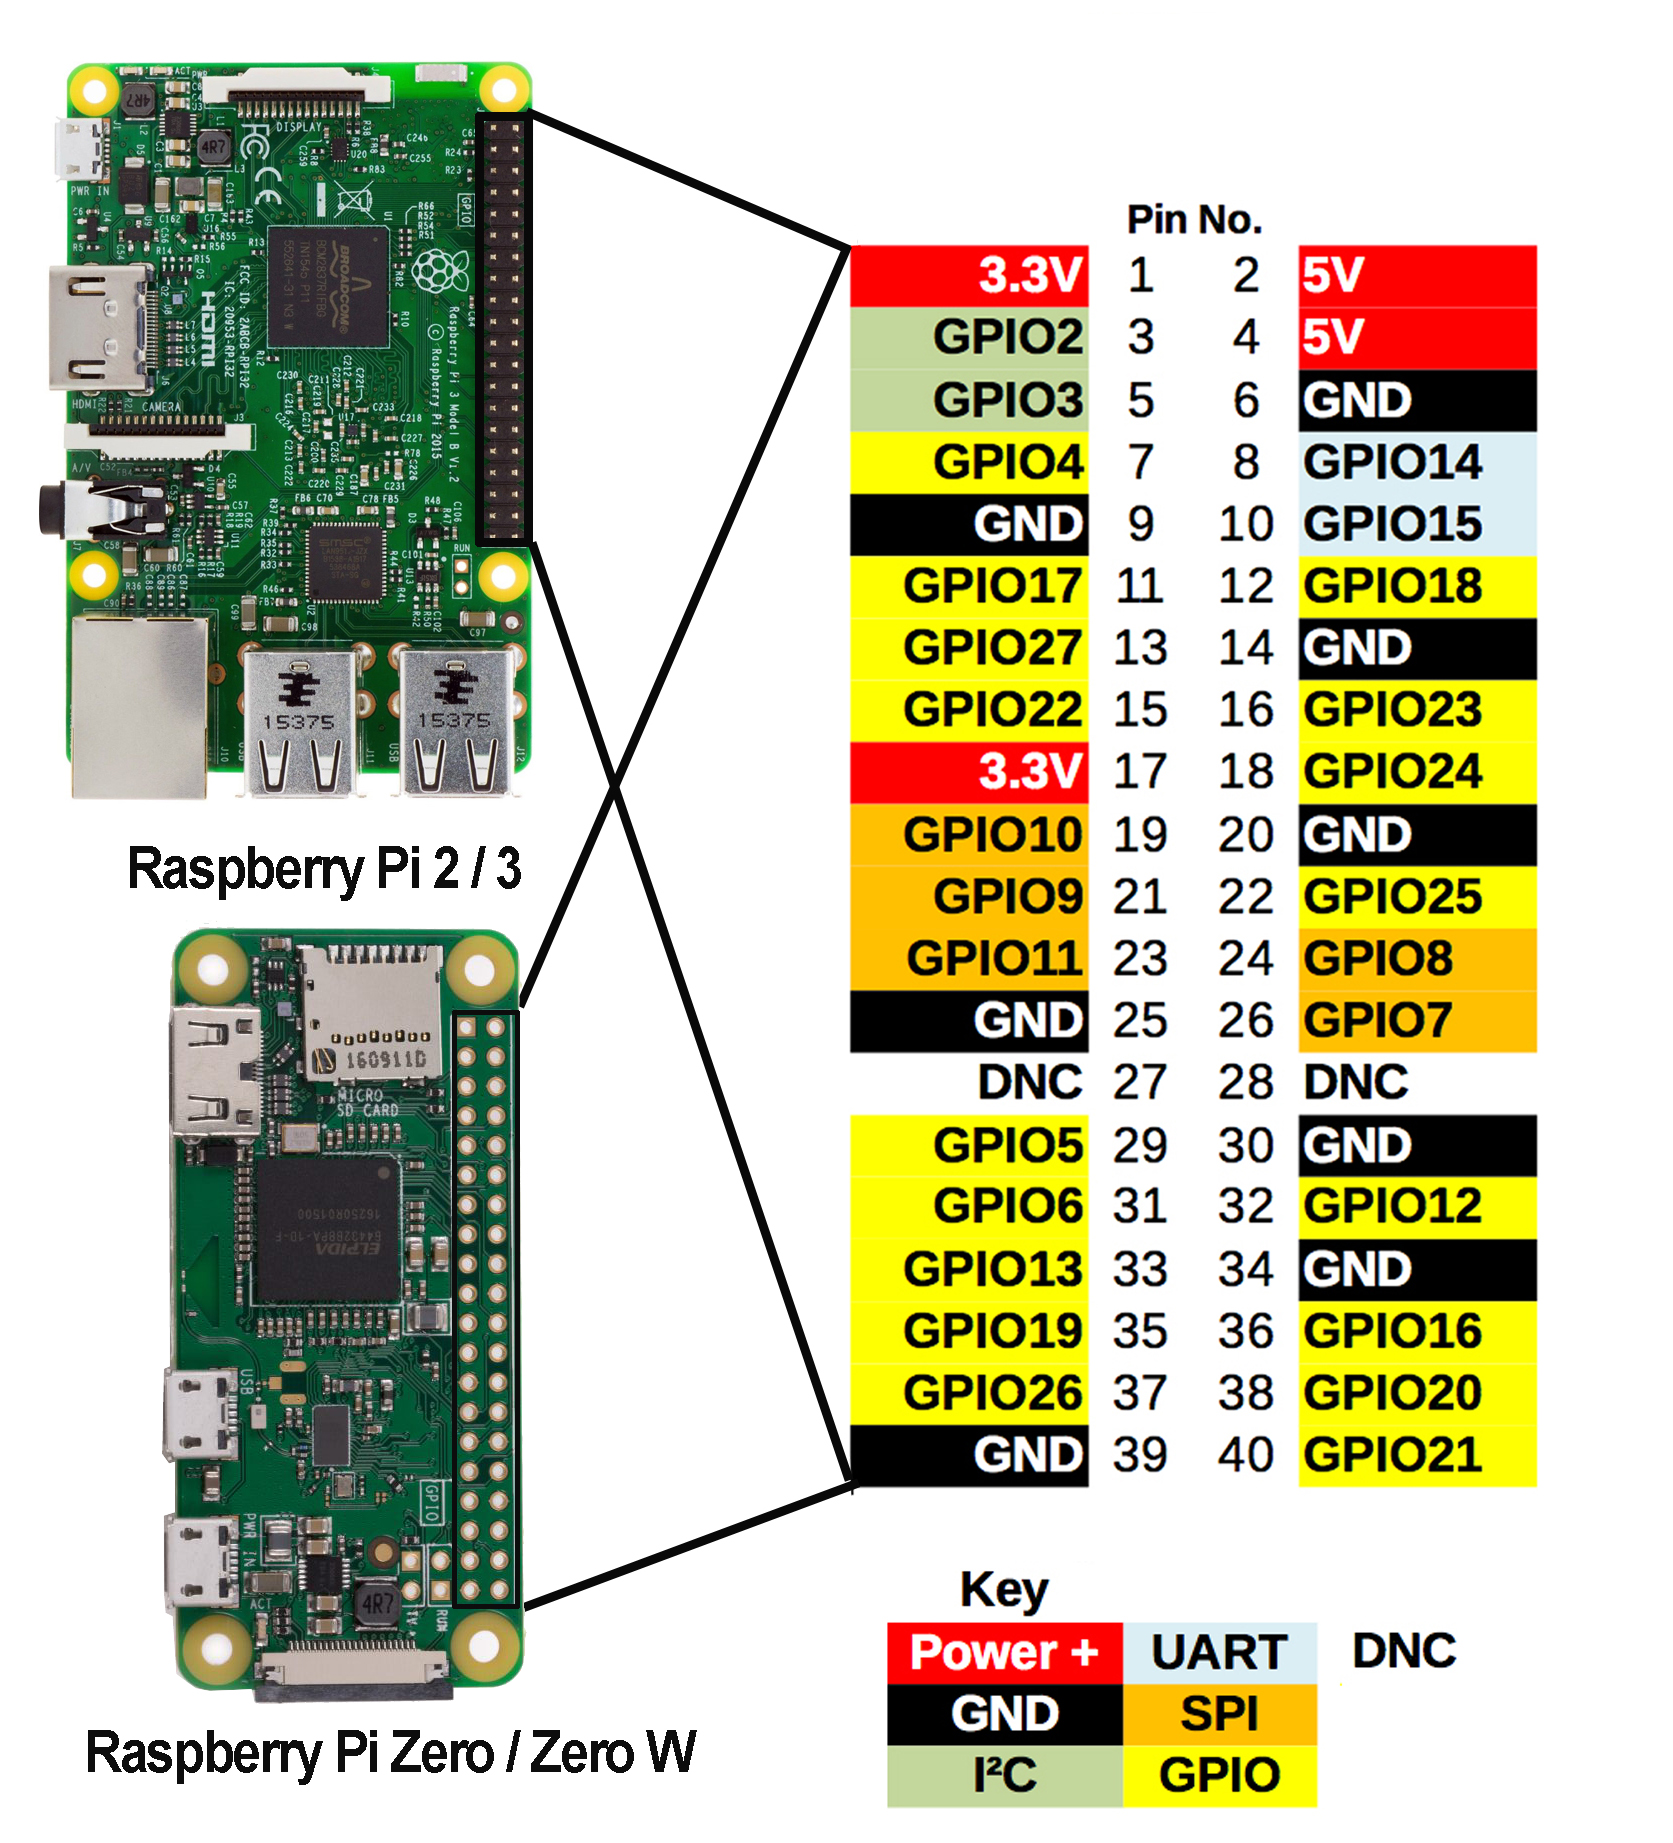
A 40-pin GPIO header is found on all current Raspberry Pi boards (unpopulated on Raspberry Pi Zero, Raspberry Pi Zero W and Raspberry Pi Zero 2 W). Prior to the Raspberry Pi 1 Model B+ (2014), boards comprised a shorter 26-pin header. The GPIO header on all boards (including the Raspberry Pi 400) have a 0.1" (2.54mm) pin pitch.
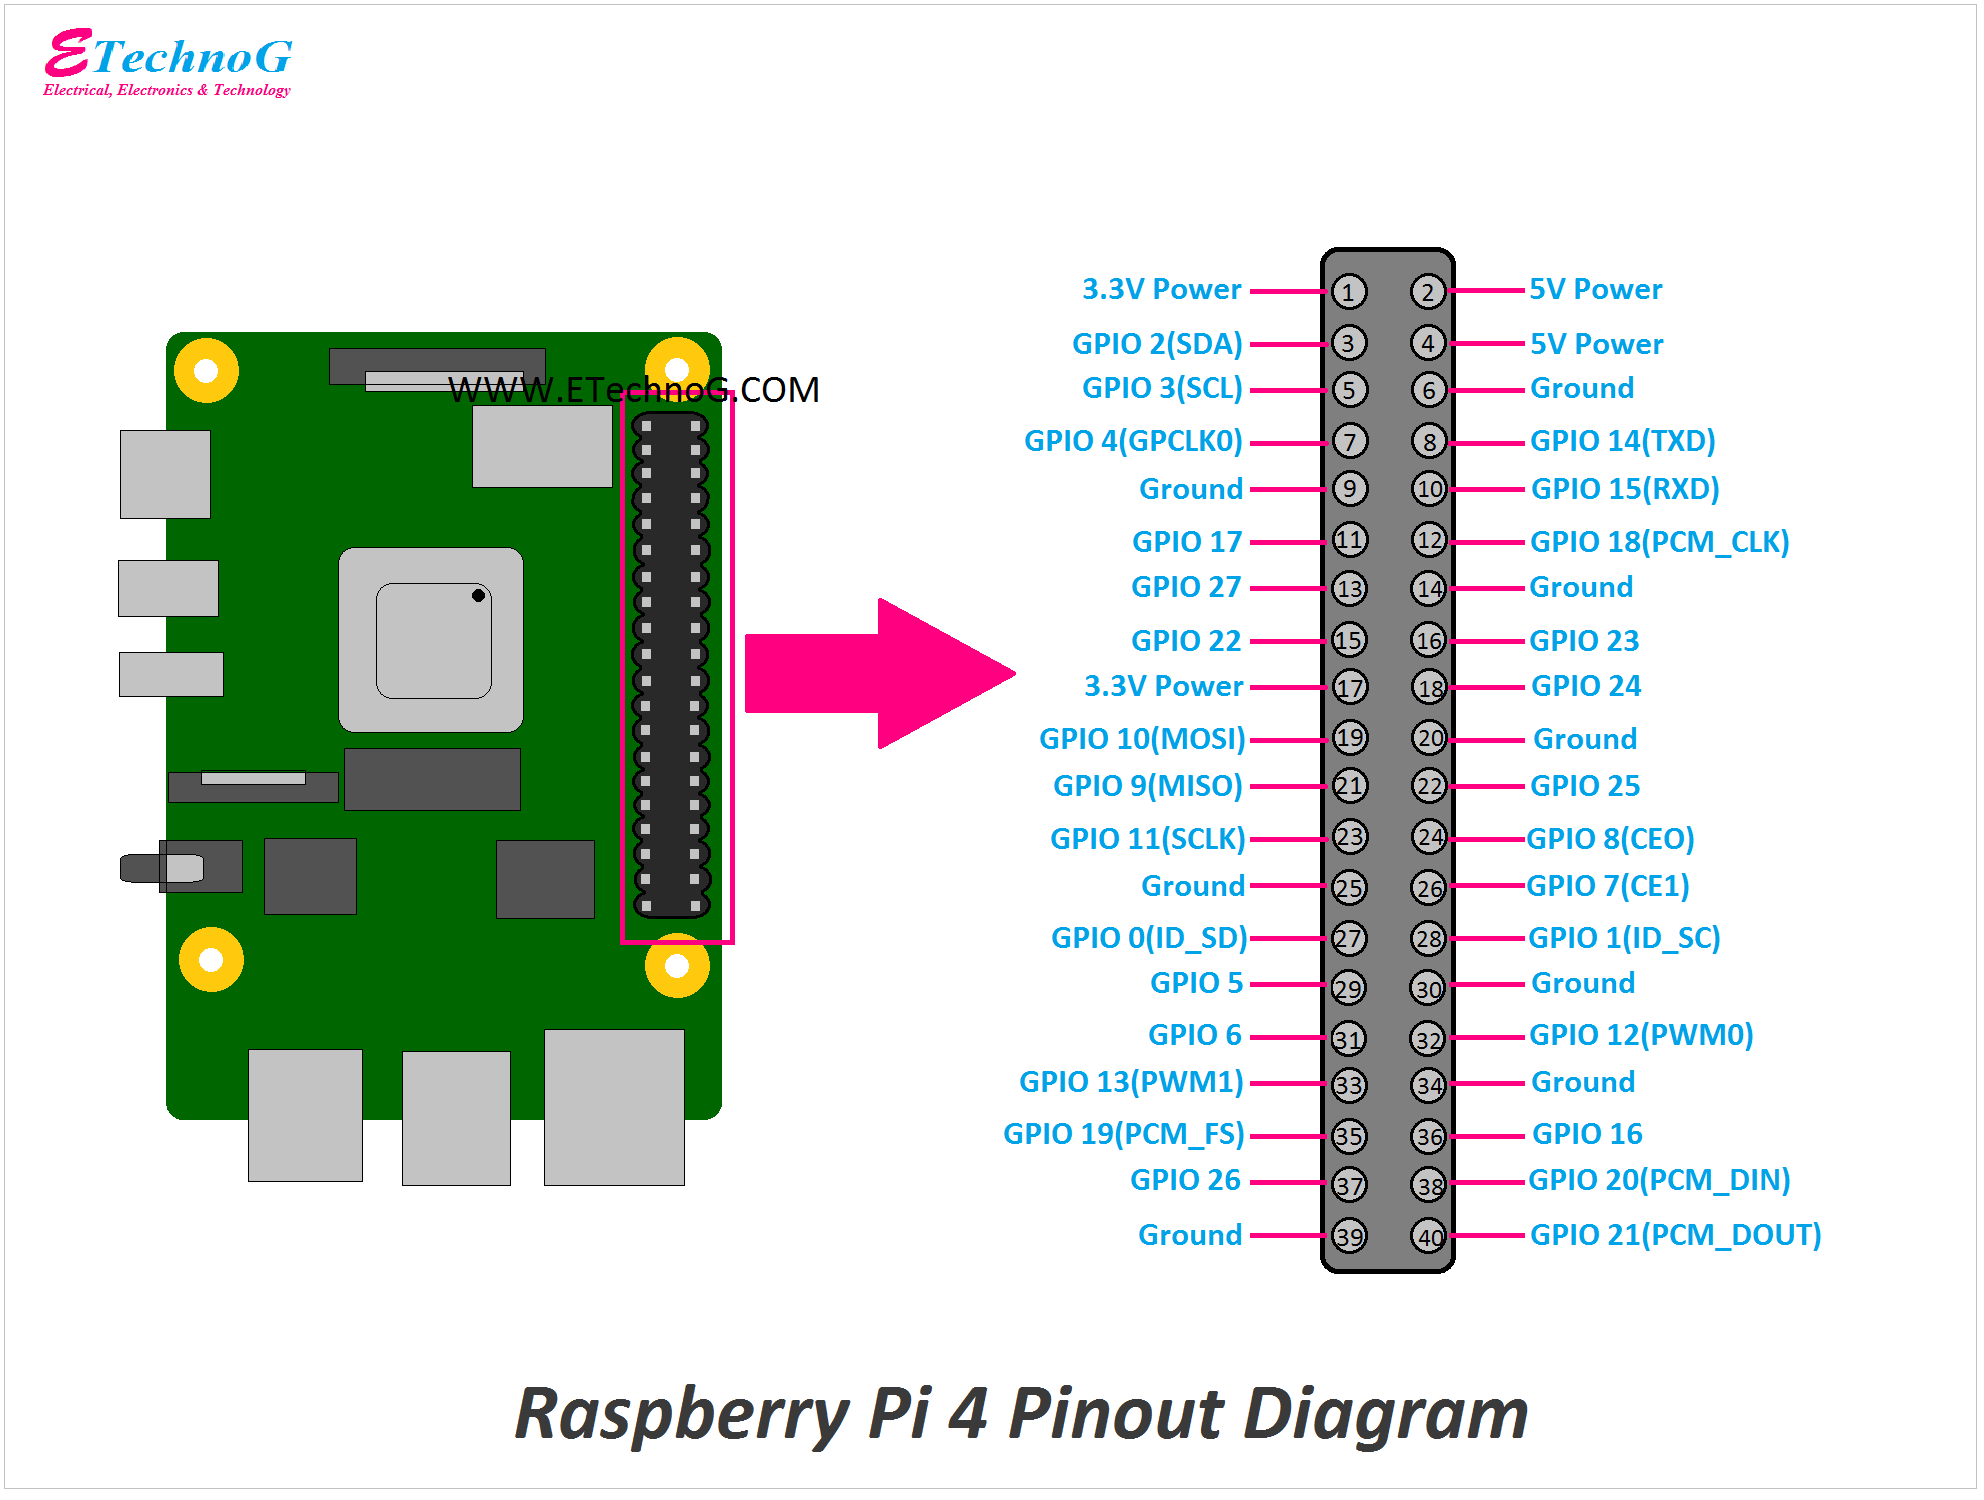
Raspberry Pi 4 Pinout Diagram and Terminals Identification ETechnoG
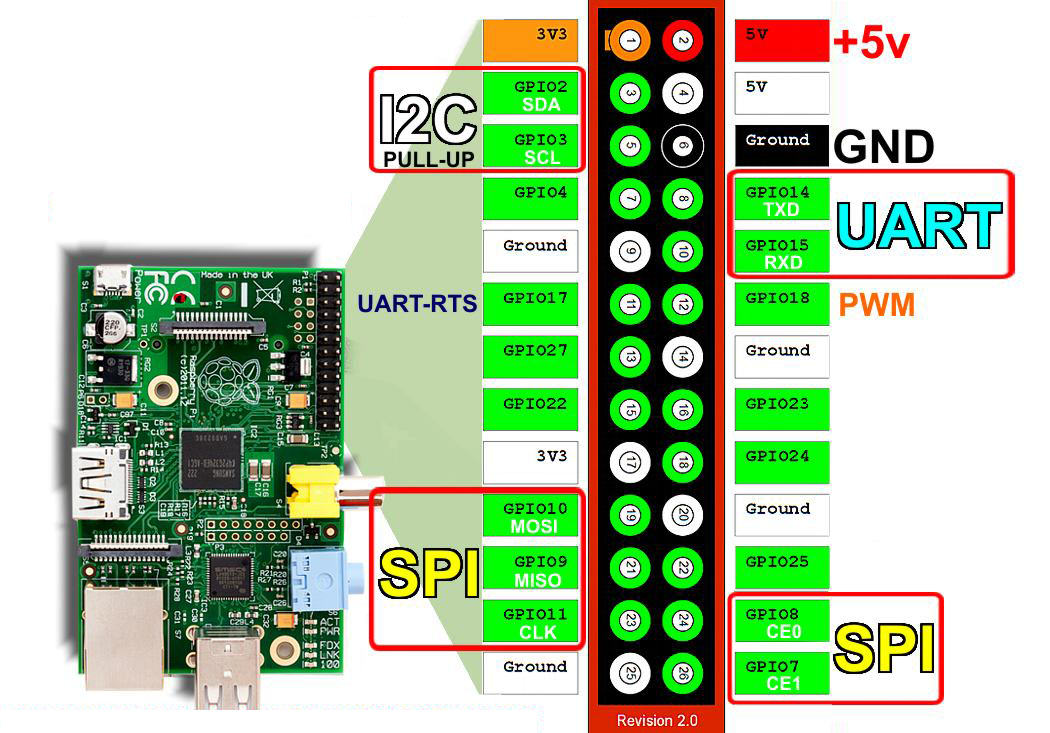
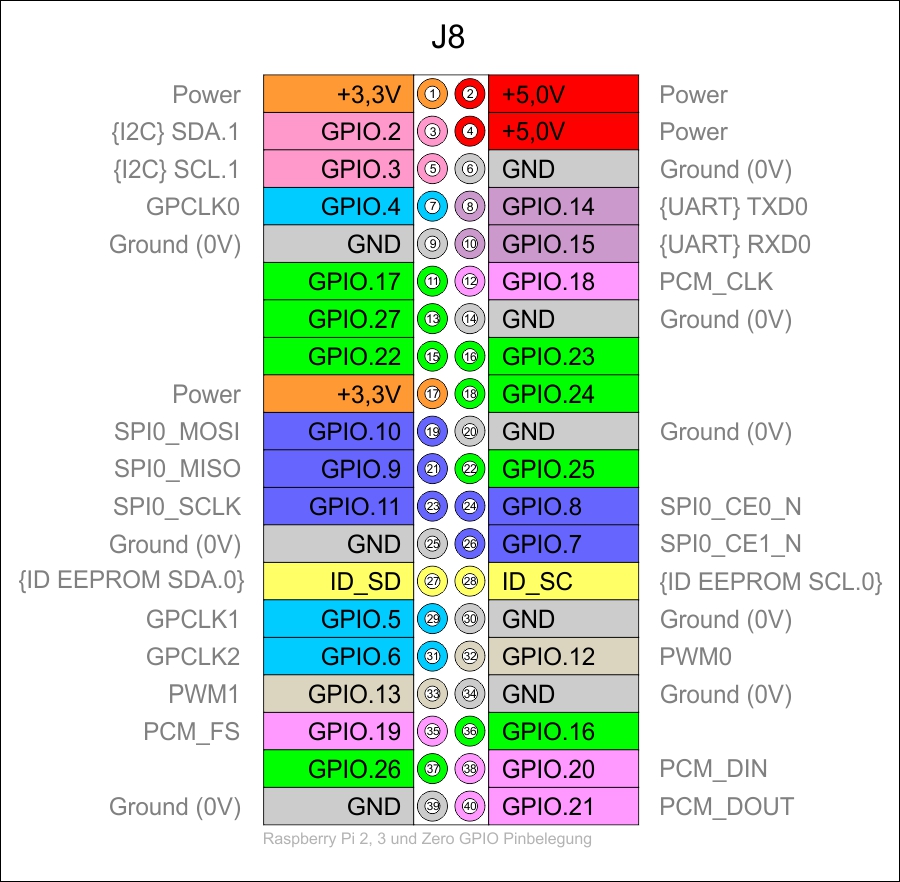
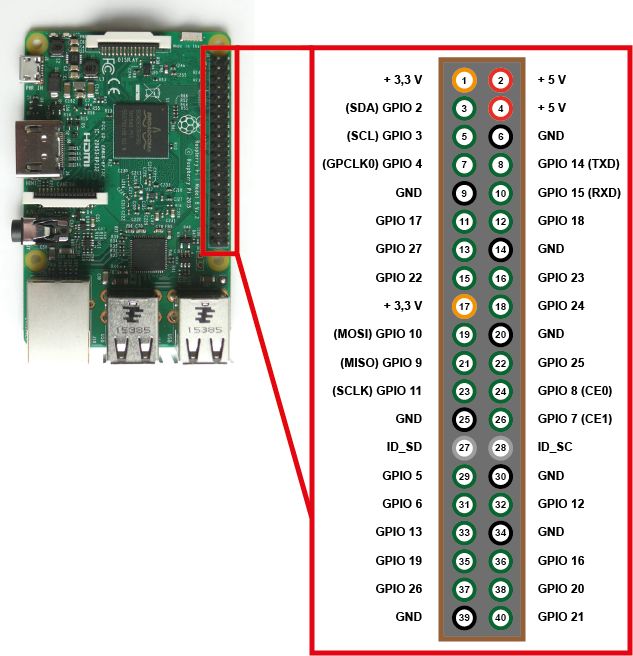
An den Power-Pins für +5V und +3,3V liegt auch dann eine Spannung an, wenn der Raspberry Pi ausgeschaltet bzw. heruntergefahren ist. GPIO 2 und GPIO 3 (Pins 3 und 5) haben je einen internen 1,8 kOhm Pullup-Widerstand verbaut. Bei den anderen GPIOs haben die internen, schaltbaren Widerstände einen Wert von 50 bis 60 kOhm.

A new graphic Pinout Raspberry PI Open Electronics Open Electronics
The Raspberry Pi 4 Model B is the latest board launched by the Raspberry Pi Foundation in June 2019. This model has the latest high-performance quad-Core 64-bit Broadcom 2711, Cortex A72 processor clocked at 1.5GHz speed. This processor uses 20% less power and offers 90% greater performance than the previous model.
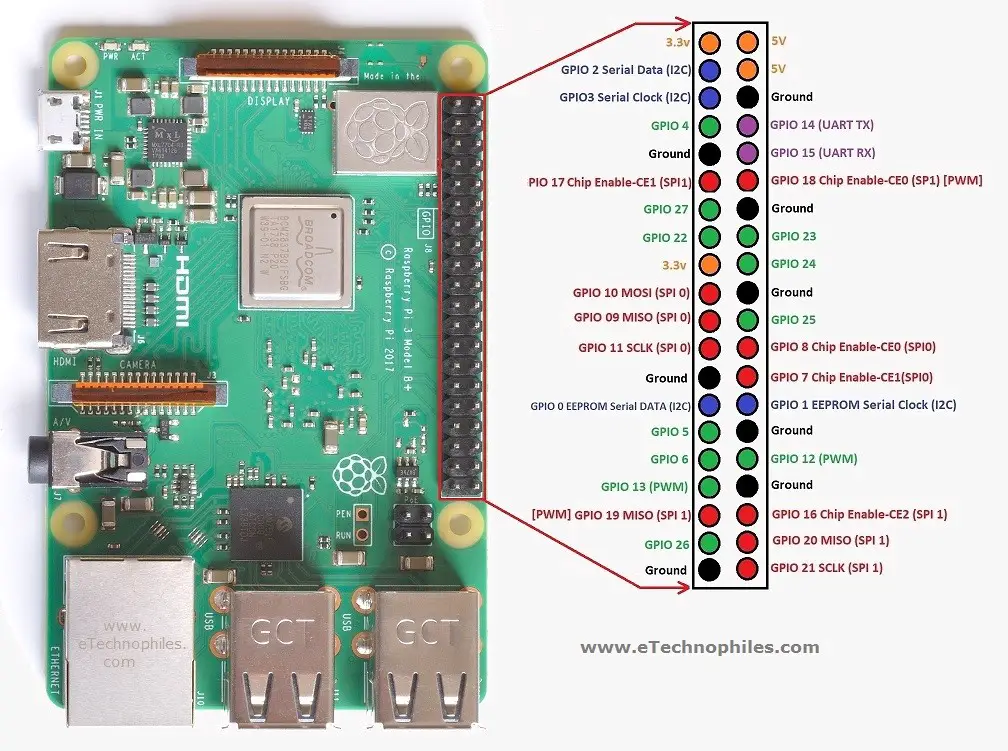
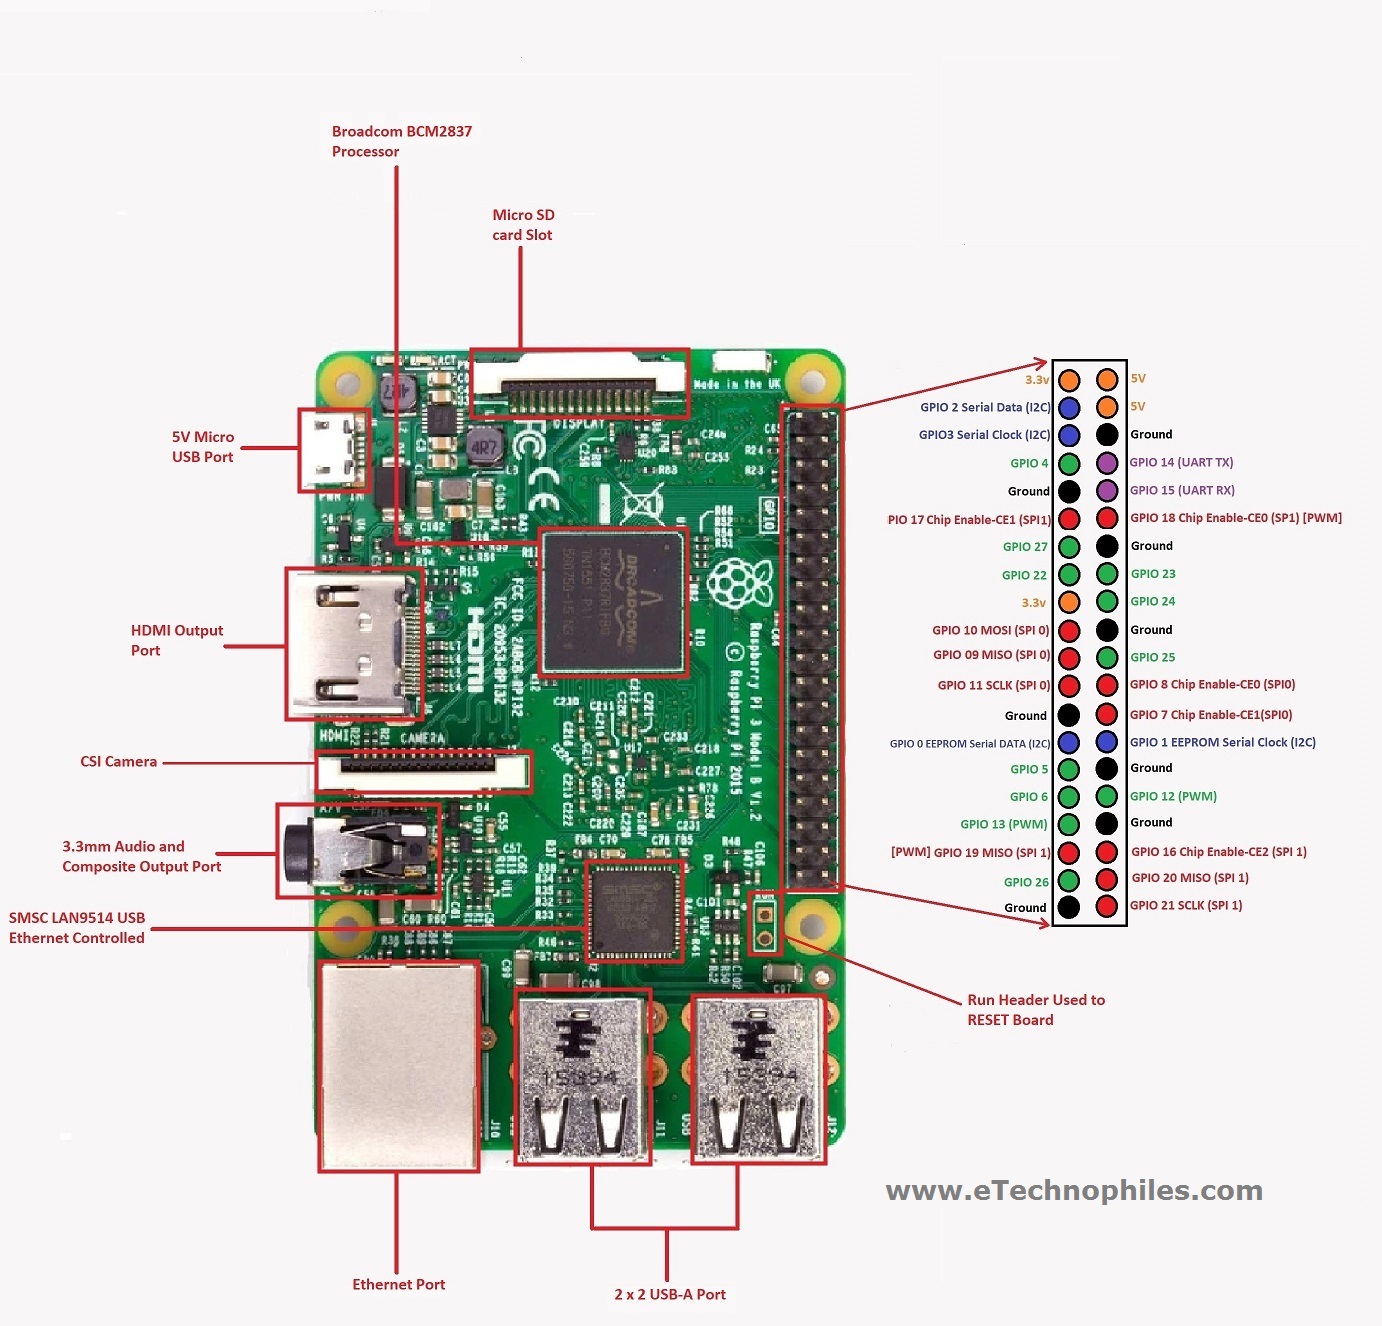
Raspberry Pi 3 B+ Pinout with GPIO functions, Schematic and Specs in detail (2022)
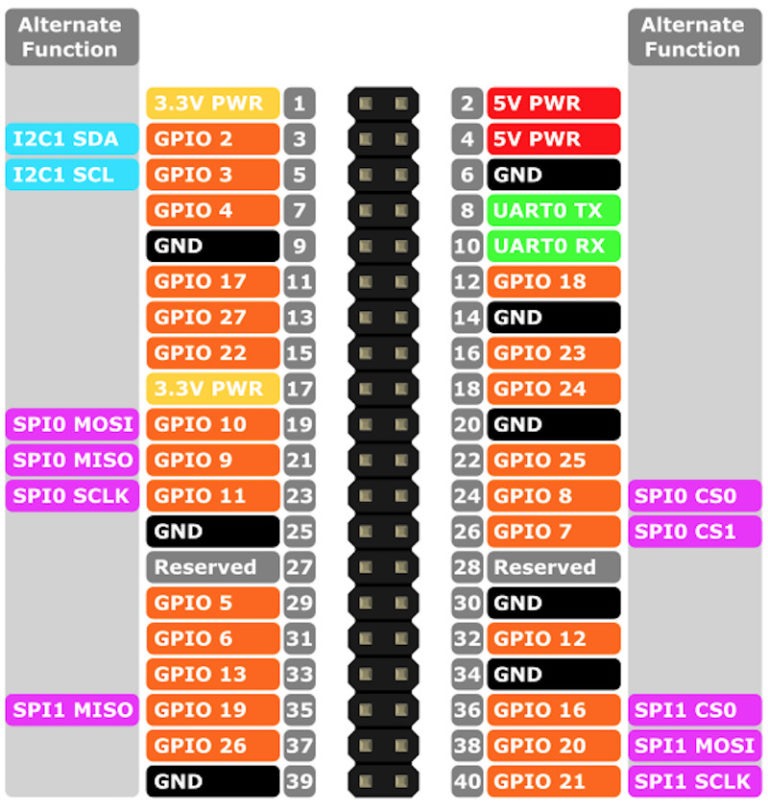
The Raspberry Pi GPIO pinout guide. This GPIO Pinout is an interactive reference to the Raspberry Pi GPIO pins, and a guide to the Raspberry Pi's GPIO interfaces. Pinout also includes hundreds of pinouts for Raspberry Pi add-on boards, HATs and pHATs. Support Pinout.xyz. If you love Pinout, please help me fund new features and improvements:
Raspberry Pi 4 Pins Complete Practical Guide The Robotics BackEnd
The Raspberry Pi Sense HAT is an add-on board that gives your Raspberry Pi an array of sensing capabilities. The on-board sensors allow you to monitor pressure, humidity, temperature, colour, orientation, and movement. The bright 8×8 RGB LED matrix allows you to visualise data from the sensors, and the five-button joystick lets users interact with your projects.
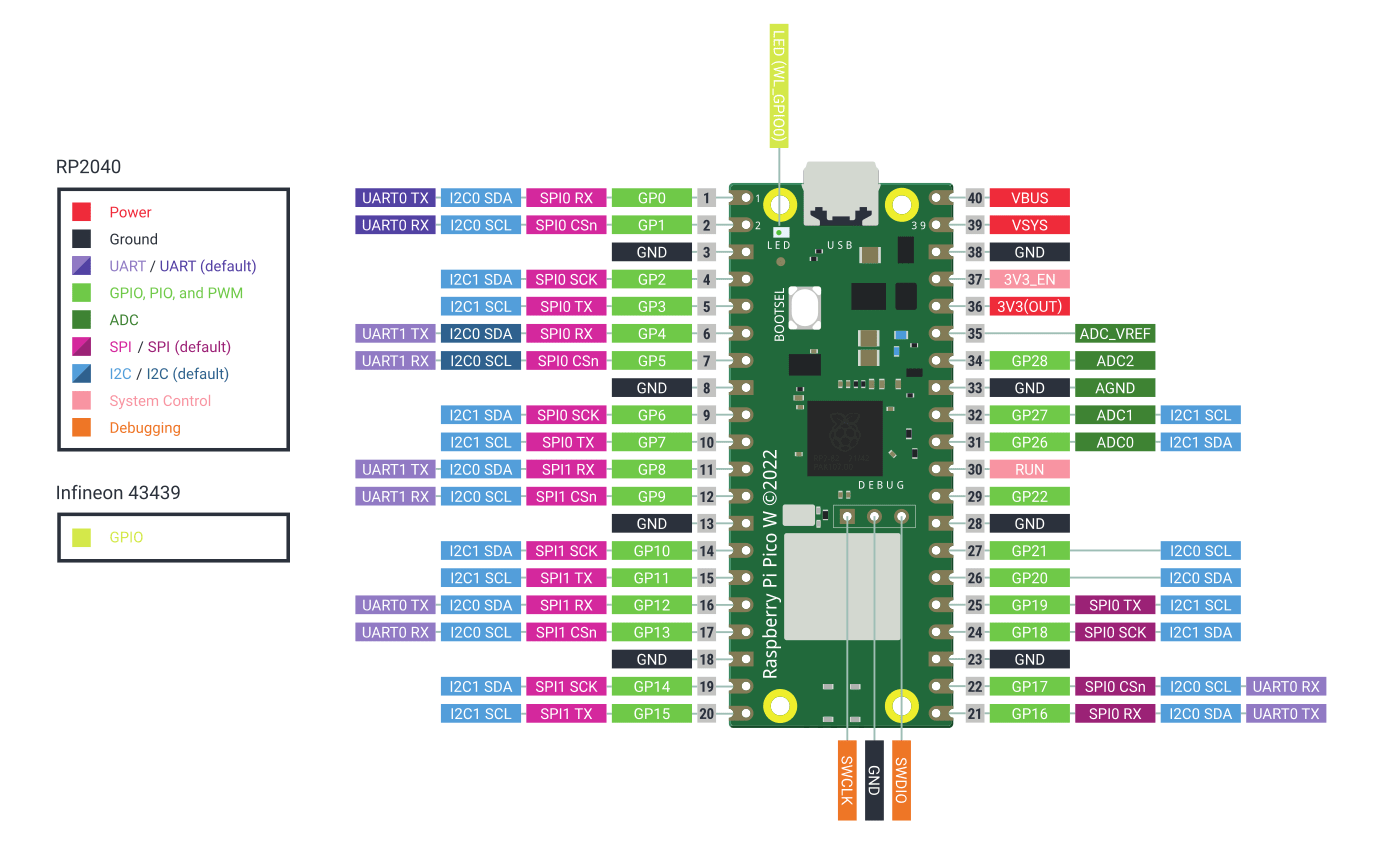
Raspberry Pi Pico W Pinout, Datasheet, Features, Specs
A powerful feature of the Raspberry Pi is the row of GPIO (general-purpose input/output) pins along the top edge of the board. A 40-pin GPIO header is found on all current Raspberry Pi boards (unpopulated on Raspberry Pi Zero, Raspberry Pi Zero W and Raspberry Pi Zero 2 W). Prior to the Raspberry Pi 1 Model B+ (2014), boards comprised a shorter.
Raspberry Pi 3 GPIO Pinout and Specs in detail (Model B)
The Raspberry Pi GPIO interface offers the perfect starting point from which to control devices, such as turning lights on and off, starting the coffee machine in the morning, or turning on the TV and playing your favorite movies at scheduled times. more ». Using Raspberry Pi to control an electrical outlet. Raspberry Pi fills in for a remote.

Raspberry Pi Das richtige Modell und Betriebssystem, die schönsten Projekte c't Magazin
GPIO Pinout Orientation RaspberyPi Zero W. I looked over various websites providing the pinout explanation, especially this . But I have trouble to figure them to the real rpi zero. I mean in the following image provides the pinout Information: But I cannot figure out on real rpi if the 5V and 3v3 pins are the ones located closer to sd card.

Raspberry Pi 1 GPIO Pinout, Schematic and Specs in detail
Pin 1 is clearly marked on the board as "P1". It is vital you are looking at the header the correct way round. Locate "P1" and compare the header to the diagram below : Raspberry Pi GPIO Layout - Pi 1 Model B Revision 1. The Pin marked "P1" is Pin 1 and provides 3.3V (50mA max). You can work out all the other pins from there.
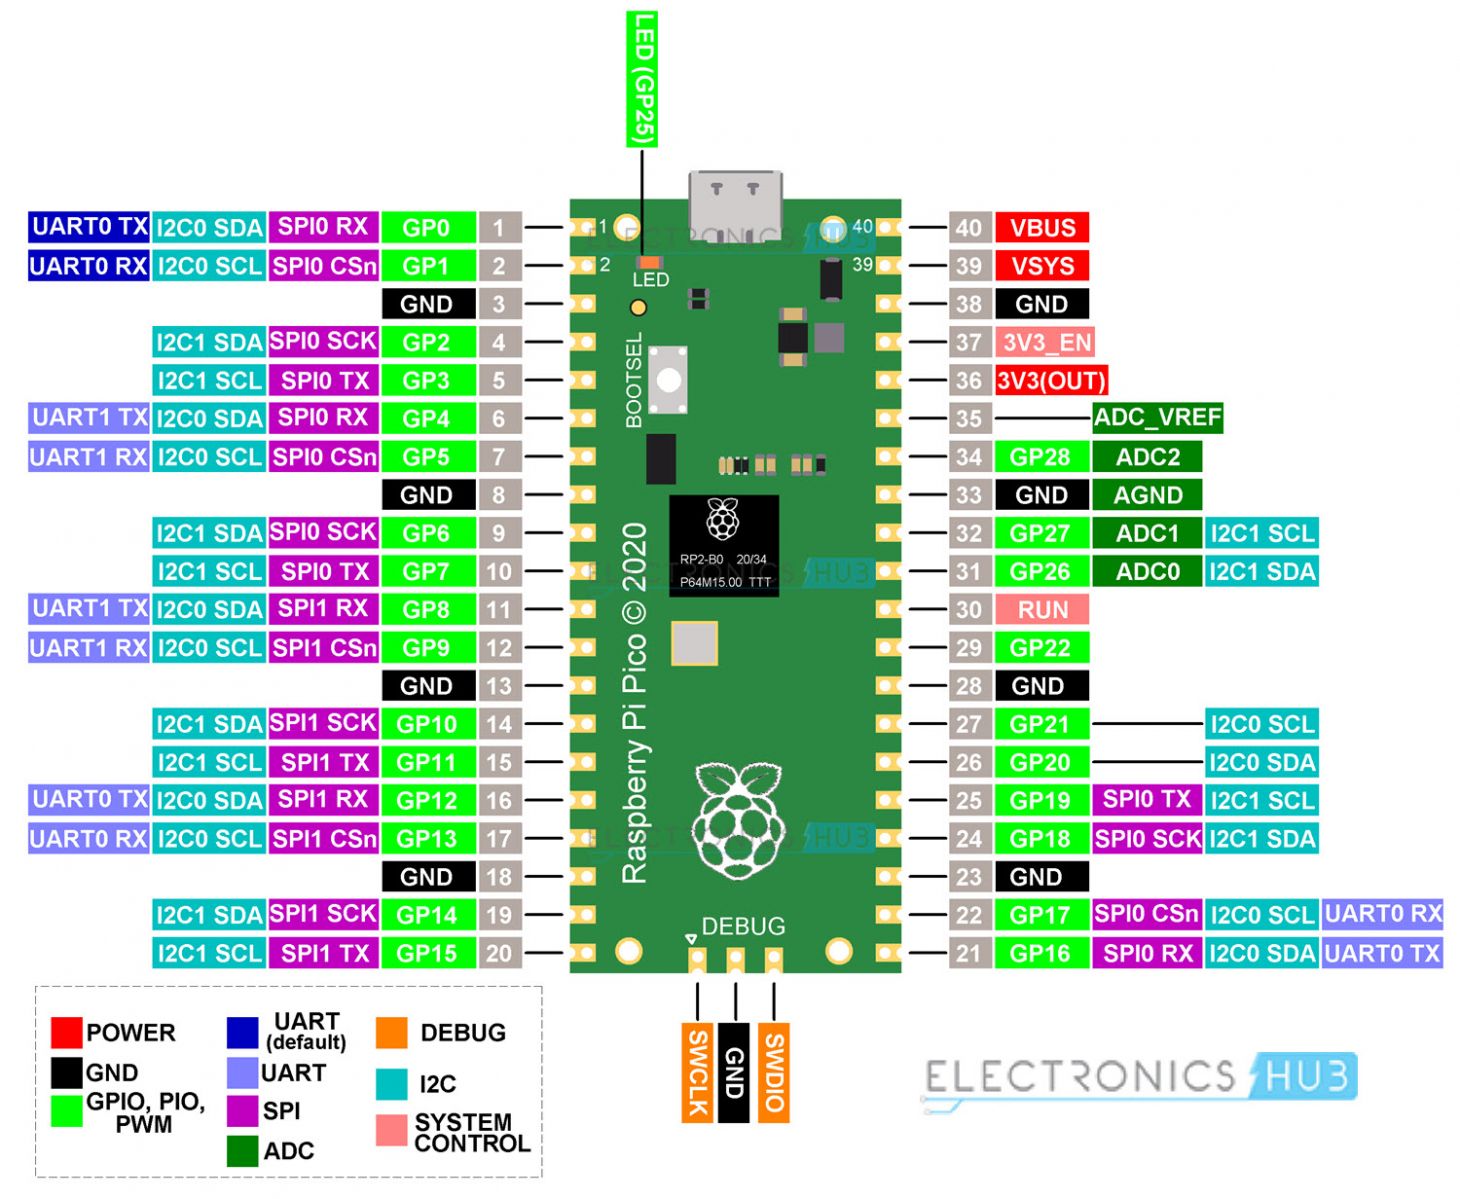
Raspberry Pi Pico Pinout Diagram Datasheet Specifications Images and Photos finder
Like every other Raspberry Pi board, R-Pi 3 B+ is a single-board computer. But it has a fast and power-efficient 1.4 GHz processor (1.2GHz in model B) and a faster gigabit Ethernet (it's limited to 300 Mbit/s by the internal USB 2.0 connection) or dual-channel 2.4 / 5 GHz 802.11ac Wi-Fi (100 Mbit/s). It also comes with a USB boot, network.
Tutorial Raspberry Pi GPIOPins mit WiringPi einrichten, ansteuern und auslesen
An den Power-Pins für +5V und +3,3V liegt auch dann eine Spannung an, wenn der Raspberry Pi ausgeschaltet bzw. heruntergefahren ist. GPIO 2 und GPIO 3 (Pins 3 und 5) haben je einen internen 1,8 kOhm Pullup-Widerstand verbaut. Bei den anderen GPIOs haben die internen, schaltbaren Widerstände einen Wert von 50 bis 60 kOhm.

Raspberry Pi 3 Pinout
The power and ground pins are used to power external circuitry. All Raspberry Pis with the standard 40 GPIO pins will have two 5V pins and two 3.3V pins, always in the same place. Along with the 5V and 3.3V pins, 8 ground pins are available. Power and ground pins are what let your Raspberry Pi power components like LEDs and motors in your project.

Raspberry Pi Die GPIOSchnittstelle (Grundlagen+Belegung) indiBit.de
Raspberry pi Zero GPIO Pinout or Pin diagram, and programming methods are explained in detail in this post. The Raspberry Pi Zero supports mini connectors (like mini HDMI, mini USB power, and USB on-the-go port) to save more space. And the 40pin GPIO is unpopulated which provides the flexibility to use only the connections that the project.
Raspberry Pi Belegung GPIO
On Raspberry Pi models starting with model 3B (including Raspberry Pi Model 4B) the hardware-based serial/UART device /dev/ttyAMA0 has been re-purposed to communicate with the the built-in Bluetooth modem and is no longer mapped to the serial RX/TX pins on the GPIO header. Instead, a new serial port "/dev/ttyS0" has been provided which is.

Raspberry Pi 2 Pinouts Digital Lab
Den ersten GPIO-Pin am Raspberry Pi erkennt man, indem man die Platine umdreht - er besitzt als einziger eine viereckige Lötstelle. Alle anderen sind rund. Die Pins, die mit +3,3V und +5V beschriftet sind, liefern Spannung in entsprechender Höhe und können für die Versorgung von angeschlossenen Bauteilen verwendet werden.
Raspberry Pi Starter Kit Lesson 2 Introduction of Raspberry Pi GPIO «
Using w1-gpio on the Raspberry Pi typically needs a 4.7 kΩ pull-up resistor connected between the GPIO pin and a 3.3v supply (e.g. header pin 1 or 17). Other means of connecting 1-Wire devices to the Raspberry Pi are also possible, such as using i2c to 1-Wire bridge chips.
